V12.1.45 / 14.1.35 / 16.1.28 / 18.1.18 Changes
* Excel Import: addressed issue that prevented importing mfg date and exp date (#20203112)
Author: admin
Complete Count Demo Video 2020
It has been 6 years since we created our CompleteCount demo video and there have been a lot of great additions to the software since then. One of the most often requested newer features which wasn’t available for the original video is Excel Link. Excel Link provides the ability to record a stock count in Excel and import it into GP.
The new CompleteCount demo video, released 5-MAY-2020, covers the entire module from front to back, including Excel Link, Tolerance Management, the Mass Add/Update Utility for assigning Values Codes and quickly adding Items to a Stock Count…and much more!
Customization CR1206- Lot Number Suffix by Receipt
Customization CR1206
Lot Number Suffix by Receipt
Description of Need:
ACME can receive multiple receipts of the same Lot Number over a period of time. They need to be able to select Lots for use in Manufacturing by the order of receipt so that the first received is consumed first.
The Lot Master table tracks a “receipt date”, but that records the date on which the lot hits a “site” in GP—so if a Lot is transferred between sites it gets a new “receipt date”.
The Lot Attribute table only has one Attribute Record per Lot Number, so multiple receipts of the same Lot Number would all use the same Lot Attribute record, making it impossible to record separate a “receipt date” in the Lot Attributes for each receipt of a Lot Number.
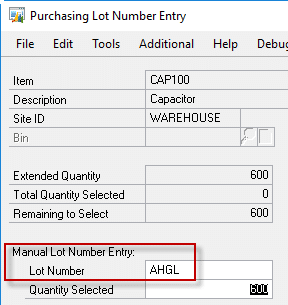
ACME manually creates PO Receipts in Dynamics GP (they are not imported or created by a WMS system). They enter the Manufacturers Lot Number in the Purchase Lot Number Entry window (they do NOT auto-generate Lot Numbers). ACME looked at their historical data and found that at most they had received 10 receipts of the same Lot Number, and that the longest lot number was 16-characters.
Description of Solution:
After entering the Manufacturer’s Lot Number in the Purchasing Lot Number Entry window, the customization will add a suffix to the Lot Number that denotes the “number of receipts” of that Lot Number. This will be added as a suffix in the format of “+nn”.
nn = 01 to 99. In the event there are more than 99 receipts, nn will become alphanumeric, starting with A1, then A2 up to A9, then B1 to B9, and so on. This allows for a total of 333 receipts of a single lot number. In the event that more receipts are needed, the suffix will stay at Z9.
The suffix separator is “+” because it is (1) recognized by the scanners ACME uses, and (2) is not used in any current Lot Numbers or as a special character by the scanners.
The suffix will cause multiple receipts of the same Lot Number to be unique (i.e. AHGL-01, AHGL-02), so that each one has its own Lot Attribute record. This will allow ACME to record the actual Date of Receipt in the attributes. Additionally, the suffix will cause the Lots to sort in order of date of receipt so that no changes are needed in the Lot Selection windows to identify which receipt of a Lot came before another receipt of the same Lot.
Since the Lot Number field can store 20 characters, the suffix above will work for Lot Numbers up to 17 characters. If a Lot Number is longer than 17 characters, the customization will not make any change to the Lot Number and will NOT provide any alert or warning to the user.
ACME discussed internally how to handle existing lot numbers and decided that those would be left as-is and that the customization would only apply to new receipts. This may mean that the “first” suffix on a receipt is larger than +01. If there have already been four receipts, the first suffix would be +05.
WilloWare discussed with ACME the other locations where Lot Numbers can be entered (such as an Inventory Adjustment). ACME decided that the PO Receipt is the only location where this control is needed.
Assumptions/Requirements:
- The functionality described above will not work with eConnect, any software that uses eConnect, or any software that directly writes to, updates, or deletes from SQL tables.
- The functionality described above is intended for the GP Desktop client.
For Information on this customization, or any other WilloWare customization or product, please contact us at:
LeanMFG Release 2020-05-04
V12.3.45 / 14.3.34 / 16.3.24 / 18.3.16 / “GP Next” Changes 4-MAY-2020
* Addressed issue that could cause MO Header History table to have some fields cleared after posting.
Customization CR1204- RM Transaction Entry- Use Billing Address ID
Customization CR1204
RM Transaction Entry-
Use Billing Address ID
Description of Need:
The Receivables Transaction window defaults to use the “primary” address shown on the Customer Maintenance window. ACME needs to use the Billing Address ID instead.
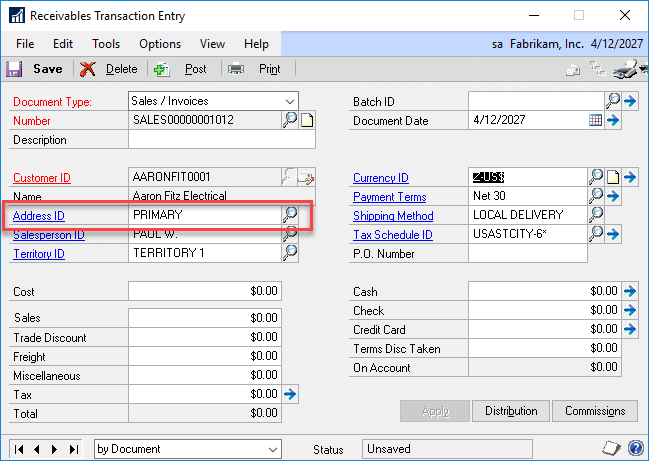
Description of Solution:
The Receivables Transaction Entry will be modified so that after selecting/entering the Customer ID, the Address ID will be changed to the Bill To Address ID from the Customer Maintenance window.
Assumptions/Requirements:
- The functionality described above will not work with eConnect, any software that uses eConnect, or any software that directly writes to, updates, or deletes from SQL tables.
- The functionality described above is intended for the GP Desktop client.
For information on this customization, or any other WilloWare customization or product, please contact us at:
CompleteCount Release 2020-04-27
V12.1.44 / 14.1.34 / 16.1.27 / 18.1.17 Changes 27-APR-2020
* Excel Export: addressed issue that prevented export of serial/lot tracked Items that have no quantity On Hand (#20202908)
Customization CR1061 Change Orders
Customization CR1061
Change Orders
Problem Definition:
Acme uses GP Project Accounting, and Change Orders (CO) to make updates to the Baseline and Forecast Budget amounts.
When they enter a CO, the same updates need to be performed to BOTH the Baseline and Forecast. Since the CO window can only update Baseline OR Forecast, users often forget to create a second CO.
The initial request from Acme was to have the posting of a Baseline CO automatically update the Forecast. WilloWare investigated this approach and found that the CO transaction is quite complicated, and attempting to duplicate posting a “Forecast” CO would not be a cost-effective approach.
The preferred and cost- effective option is to provide a method of requiring the user to enter both CO’s so that Baseline and Forecast are always updated together.
Design Features:
The “Forecast CO” routine will be triggered when:
- The PROCESS button is clicked
- A Baseline CO is displayed
- The Status = Approved
The Forecast CO routine will automatically start a new CO for a Forecast change. As shown below, the Contract Number from the Baseline CO will load automatically, a new CO Number will generate, and the Baseline CO Number will be entered in the Description field.
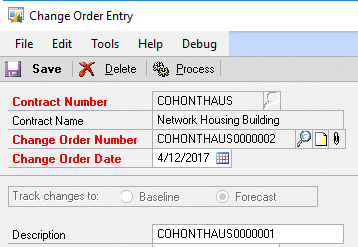
The DELETE button will be locked, and also the Description field. Locking the Description prevents accidentally changing the “linked” Baseline CO Number.
Additionally, a log table will track the following information:
- Baseline CO Number
- Created by User, Date & Time
- Forecast CO Number
- Created by User, Date & Time
Assumptions:
The functionality described above is intended for the GP Desktop client.
If you are interested in this customization, or any other WilloWare customization or product, please contact us at:
Customization DS1045 Auto-set PO Buyer ID
Customization DS1045
Auto-set PO Buyer ID
Problem Definition
Acme needs to make the Buyer ID required on PO Entry. This requirement has been met by modifying the PO Entry window. However, that modification only applies when POs are created in the PO Entry window. Acme uses Dynamics GP Field Service.
Acme also needs the Buyer ID to be populated for PO’s coming from the Service Call Parts and Additional Charges windows.
Design Features
Acme’s Buyer IDs are always the same as the GP User ID.
When a PO is created from Field Service, the enhancement will:
- Check that the GP User ID, in upper-case, exists as a Buyer ID in GP. If not, it will create a Buyer ID based on the User ID and User Name.
- Update the Buyer ID on the PO Header created by Field Service
Assumptions/Requirements
The functionality described in this document is intended for the Dynamics GP desktop client. Unless specified otherwise, all testing will occur in the desktop client only. Projects created in Dexterity should have a very high level of compatibility with the Web Client, but cannot be guaranteed without explicitly including additional time in the estimate for testing in the Web Client.
If you are interested in this customization, or any other design spec or product, please contact us at:
Customization DS1068 Always Backorder
Customization DS1068
Always Backorder
Acme would like to be able to enter a Sales Order, and always have the quantity backordered, even if there is availability.
When they are ready to ship an order, they allocate the order and use the Separate Order Fulfillment process.
Solution Overview
A new Setup window will be created where Acme can specify which Order Type IDs should receive the “Backorder All” treatment.
When one of these Order IDs is used in Sales Transaction Entry, the quantity of all line items will always be forced to Qty to Backorder.
Design Features
Setup
Navigation: Tools >> Setup >> Company >> Acme Setup
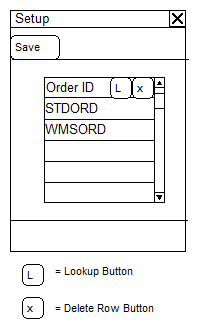
The Order IDS listed here will be forced to always backorder the quantity entered on the order, regardless of available inventory.
|
Field |
Function |
|
Order ID |
Enter a SOP Order ID, or select one from the Lookup. |
Sale Transaction Entry
When a Sales Order is created, or an existing order is viewed, which has an Order Type ID entered in the Setup window, the following changes will be applied to the Sales Transaction Entry window.
- The Quantity entered will be immediately set to Backorder, regardless of the availability of inventory for the Item.
- The Qty Invoiced and Qty Fulfilled fields will be locked. For the specified Order IDs, Sales Transaction Entry will behave as if there is not any available inventory of the item, so locking these fields simply prevents a user from attempting to use them and getting quantity shortage warnings.
- The Quantity Available field will still display the correct/true quantity available.
Assumptions/Requirements
The functionality described in this document is intended for the Dynamics GP desktop client. Unless specified otherwise, all testing will occur in the desktop client only. Projects created in Dexterity should have a very high level of compatibility with the Web Client, but cannot be guaranteed without explicitly including additional time in the estimate for testing in the Web Client.
If you are interested in this design spec, or any other WilloWare customization or product, please contact us at:
ETO Release 2020-04-06
V12.2.36 / 14.2.19 / 16.2.12 / 18.2.8 / (GP Next)
* ME Copy: Addressed issue when copying a GP MFG BOM to a Destination Item Number already exists in GP that caused the Source Item Number to be populated (#20202561)
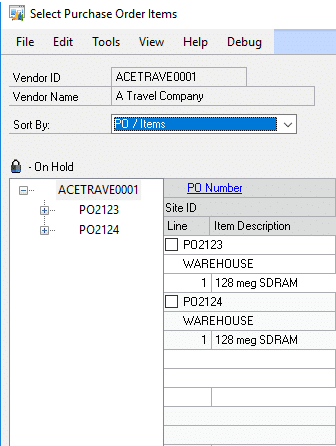
PO Receipt User-Site Restriction
Customization DS1184
PO Receipt User-Site Restriction
Problem Definition
At any given time, Acme, Inc. will have a large number of open Purchase Orders and In-Transit Transfers for each of their multiple locations. The large volume of open transactions makes using the “Select Purchase Order Items” window cumbersome because users need to scroll through so many documents to find the correct one. Additionally, users can mistakenly receive all POs/ITTs if they think they have already selected a single Purchase Order when they click the MARK ALL button.
Since most users only work with one of Acme’s sites, they would like a way to specify which sites a user works with and have the Select Purchase Order Items window display ONLY lines for the user’s site (or sites). Acme would like this set up to be at an “admin” level. It does not need to be changed by the user when creating a PO Receipt.
Solution Overview
WilloWare will add a new window to Dynamics GP to assign Sites (Location Codes) to User IDs. These site assignments will be used to restrict which PO Lines/ITT Lines appear in the Select Purchase Order Items window.
Design Features
PO Receipt User-Sites
Navigation: Tools >> Setup >> Purchasing >> PO Receipt User-Sites

| Field | Function |
| User ID | Enter a User ID or select one from the Lookup. |
| Site ID | Enter a Site ID or select one from the Lookup. |
This window is used to create a link between a User ID and the Site (or Sites) that the User will see in the “Select Purchase Order Items” window. A User ID with NO Site ID assignments will not see any PO Lines on the Select Purchase Order Items window.
Each row must have both a User ID and Site ID.
Select Purchase Order Items
The Select Purchase Order Items window will be restricted automatically based on the relationships in the PO Receipt User-Sites window. There will be no indication that the restriction has occurred other than the “disallowed” sites not being shown in the window.

Assumptions/Requirements
- The functionality described above will not work with eConnect, any software that uses eConnect, or any software that directly writes to, updates, or deletes from SQL tables.
- The functionality described above is intended for the GP Desktop client.
- Word Template functionality is not addressed in this document.
If you are interested in this customization, or any other WilloWare customization or product, please contact us at:
Customization DS1261 Historical Stock Status with Lot Numbers
Customization DS1261
Historical Stock Status with Lot Numbers
Acme, Inc uses Microsoft Dynamics GP. Dynamics GP provides a Historical Stock Status Report by Item Number, but Acme needs Lot Number level detail.
A new Historical Stock Status-Lot Number report (a Report Writer report) will be created within Dynamics GP.
The details of the report can be found in the Design Features section.
Historical Lot Report
Navigation>>Reports>>Inventory>>Historical Inventory Reports
This window will be used to enter restriction criteria and print the report.
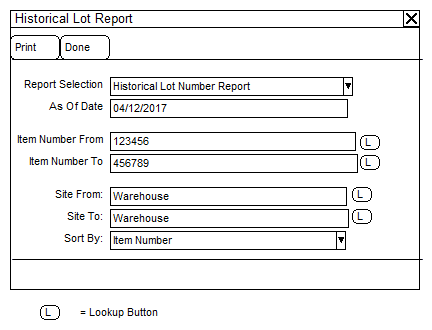
|
Field |
Function |
|
Report Selection |
Currently there is only one option:
|
|
As of Date |
The user will enter the “As of Date”. The report will pull through both Quantity On Hand and Standard Cost based on the “As of Date”. This is a required field and will default to the current user date. |
|
Item Number From |
The user will enter an Item Number or select it from the lookup to start the Item Number range. |
|
Item Number To |
The user will enter an Item Number or select it from the lookup to end the Item Number range. |
|
Site From |
The user will enter a Site or select it from the lookup to start the Site Range. |
|
Site To |
The user will enter a Site or select it from the lookup to end the Site Range. |
|
Sort By |
The user will select to sort the report by Item Number or Site ID. This selection only changes the Sort Order of the Historical Inventory Valuation Report. |
|
Print Button |
The user will select the PRINT button to print the selected report. |
|
Done Button |
The user will select the DONE button to exit the window. |
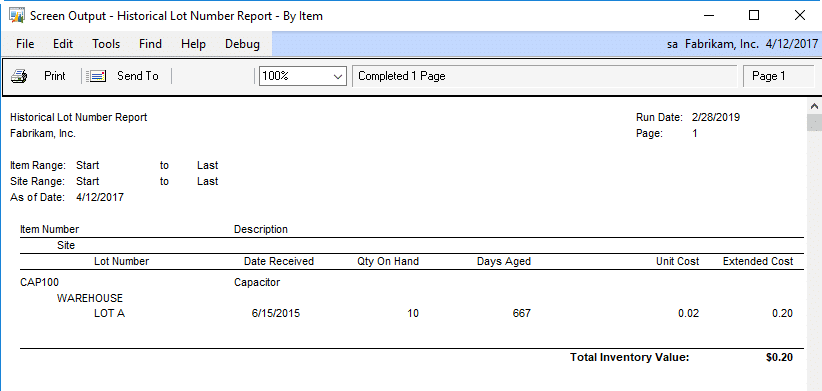
The user does not need to enter an Item Number or Site Range. Selecting the PRINT button with these fields blank will print the report for all Item Numbers in all Sites. Item Numbers with ZERO on hand quantity will NOT print. Items with positive and/or negative quantities will print.
When the PRINT button is selected, the user will be prompted to either print the report to:
- Screen
- Printer
- File
The report fields are listed below:
- Date
- Item Number
- Item Description
- Site
- Lot Number
- Date Received*
- Quantity on Hand
- Days Aged*
- Manufacture Date
- Expiration Date
- Standard Cost
- Extended Cost (Standard Cost x Quantity on Hand)
The Total Inventory Value will be printed at the bottom of the last page.
PLEASE NOTE:
- The column Date Received will display the most recent Date Received prior to the As of Date as there is the potential within Dynamics GP for multiple Receipt Dates per Lot Number
- The column Days Aged will equal the (As of Date – Date Received)
Calculations
There is no user interface for this part of the enhancement. SQL queries and/or DEX calculation routines will be utilized to determine reporting quantities and costs. The basis for the calculations will be the “As of Date” entered in the Historical Inventory Reports window. The enhancement will begin with the current On Hand Quantities for all Items/Sites selected in the range. The enhancement calculation code will then “reverse” all Inventory Transactions which have a Document Date after the “As of Date” entered.
Backdated transactions MUST have their Document Date backdated prior to posting. It is the Document Date that will determine whether a transaction should be included or excluded from the on-hand calculation.
Once the enhancement has determined the accurate on-hand quantities based on the “As of Date,” it will determine the appropriate Historical Standard Cost per Item. The Historical Standard Cost will also be based on the “As of Date.” All historical on-hand quantities of an Item will be valued at the same Standard Cost. For example:
On hand balance of item 123 as of 12/31/2012 is zero.
100 pieces of item 123 received on 01/01/2013 @ standard cost $1.00
101 pieces of item 123 received on 01/15/2013 @ standard cost $2.00
99 pieces of item 123 received on 1/20/2013 @ standard cost $1.25
No quantities have been “sold” or “used”.
If the Historical Inventory Valuation Report is run with an As of Date of:
- 01/31/2018 – 300 pieces on hand @ 1.25 per unit = $375.00 total
- 01/16/2018 – 201 pieces on hand @ 2.00 per unit = $402.00 total
- 01/01/2018 – 100 pieces on hand @ 1.00 per unit = $100.00 total
Sample Report
Assumptions/Requirements
- Multi-Bin is NOT enabled.
- Multi-Currency is NOT enabled.
- Inventory Quantity Types other than On Hand are NOT required to print on either Historical report.
- All Inventory Items with an Item Type of Sales Inventory or Discontinued must have a Periodic Valuation Method. (Items must be set to Standard Cost.)
- Maintain Transaction History must be selected for all Items.
- This report will not necessarily tie to the General Ledger.
If you are interested in this customization or any other project or product, please contact us at:
MFG PowerPack Release 2020-03-30
V12.4.157 / 14.4.104 / 16.4.70 / 18.4.31 / “GP Next”
* Proposed Cost Update: (1) added update options for “Last Cost”, “First Cost” and “Custom”. The last option uses new stored procedures that can be modified to add any desired custom business logic to return the Proposed Cost, Fixed Overhead Cost and Variable Overhead Cost. (2) Added a GoTo button to open the Manufacturing Standard Cost Changes window directly from Proposed Cost Update.
Automatic Update Labor and Cycle Time on Routing Sequence
DS0784
Automatic Update Labor and Cycle Time on Routing Sequence
Historically, Acme has setup item routing values for Labor Time and Cycle Time in Dynamics GP when a product is commercialized. The Senior Cost Accountant at Acme has received numerous requests to troubleshoot cost/margin issues and improve overall accuracy of the cost to manufacture.
Over the past year, she has rolled out Data Collection in GP to track time to complete manufacturing orders, which she then uses to calculate actual labor values. The calculation and reentry process for labor values has been a tedious process, and is generally only executed when there is a problem.
As a proactive approach, Acme would like to invest in a customization/product that could aid in generating regularly updated labor costs. This application would pull a given set of data collection information for the prior 12 months, calculate, assess and either apply the update to each routing sequence or flag the routing sequence to review based on a threshold.
Design Features
Update Routing Sequence Utility
Navigation: Utilities-Manufacturing-Update Routing Sequence Utility
This window is used to view and update Routing Sequences’ Labor Time and Cycle Time as well as its Work Center ID. The scrolling window will automatically populate when the window is opened. Only Item Number/Routing Name/Sequence combinations that match all of the following criteria will be displayed in the scrolling window:
- At least one Manufacturing Order (MO) exists with a Due Date in the last 12 months for the Item Number/Routing Name combination.
- The MO status is Complete or Closed.
- Actual Labor Time was entered for the MO/Routing Sequence combination.
For instance, if the Update Routing Sequence Utility window was accessed on August 4, 2018, the scrolling window would automatically populate with detail from Complete and/or Closed MO’s with a Due Date from August 4, 2018 through August 4, 2019.
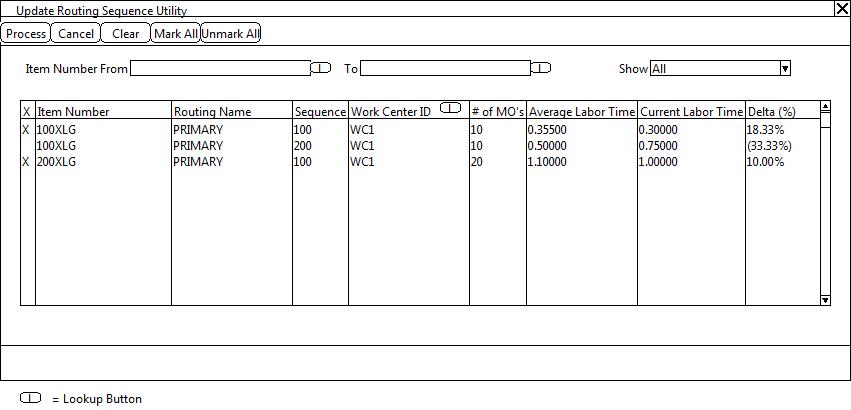
| Field | Function |
| Process Button | The user will click the PROCESS button to update all marked records in the scrolling window.
Name/Sequence combination with the value entered in the Work Center ID field. |
| Cancel Button | The user will click the CANCEL button to exit the window. |
| Clear Button | The user will click the CLEAR button to clear the Item Number filter and refresh the scrolling window. |
| Mark All | The user will click the MARK ALL button to mark all records displayed in the scrolling window. |
| Unmark All | The user will click the UNMARK ALL button to unmark all records displayed in the scrolling window. |
| Item Number From | To filter the scrolling window on an Item or range of Items, the user will enter or select an Item Number from the lookup. This is the beginning of the Item Number range. |
| To | The user will enter or select an Item Number from the lookup. This is the end of the Item Number range. |
| Show | The user will select an option from the dropdown. The dropdown will default to “All.” Options include:
If records are marked, and the user changes the Show dropdown, all work will be lost. The user will be warned prior to updating the scrolling window. |
| X | This is a checkbox. The user will mark a record by checking the checkbox. |
| Item Number | The Item Number will display. This field is not editable.
This field is a hyperlink. Clicking on the Item Number will open the MO Detail Inquiry window. Them MO Detail Inquiry window is described in detail in the next section of this document. |
| Routing Name | The Routing name will display. This field is not editable. |
| Sequence | The Sequence Number will display. This field is not editable. |
| Work Center ID | The current Work Center ID entered on the Item Number/Routing Name/Sequence combination will display. The user may enter or select a different Work Center ID from the lookup. |
| # of MO’s | The Number of MO’s that have had Labor Time captured for this Item Number/Routing Name/
Sequence for the last 12 months will display. This field is not editable. |
| Average Labor Time | The Average Labor Time will display. This is a weighted average. The enhancement will calculate Average Labor Time using the following methodology: |
| MO Number | Item Number | Routing Name | Sequence | Total Labor Time per MO | Total MO Receipt Qty | Time per Unit |
| MFG01122 | 100XLG | PRIMARY | 100 | 1.5000 | 5 | 0.30000 |
| MFG01124 | 100XLG | PRIMARY | 100 | 2.0000 | 4 | 0.50000 |
- Sum the Total Labor Time per MO to calculate the Total Labor Time for the Routing Sequence.
(1.5000 + 2.00000) = 3.50000
- Sum the Total MO Receipt Qty for all MO’s with entered Labor Time.
(5 + 4) = 9
- Divide the Total Labor Time by the Total End Quantity to calculate the Average Labor Time.
(3.50000) / 9 = 0.38889
| Average Labor Time, continued | This field is editable. The user may enter a new Average Labor Time to use in the Update Process. |
| Current Labor Time | The current Labor Time entered on the Item Number/Routing Name/Sequence combination will display. This field is not editable. |
| Delta % | The Delta will be displayed as a percentage. The Delta is calculated as:
(Average Labor Time – Current Labor Time/ Current Labor time |
Audit Trail
An Audit Trail SQL table will be provided to capture the following detail of each Update:
- Item Number
- Routing Name
- Sequence
- Labor Time Before
- Labor Time After
- Work Center Before
- Work Center After
- Change Date
- User ID
PLEASE NOTE:
Acme only enters WIP Entry transactions for Labor Time. Setup Time, Machine Time, and Indirect Labor
time are NOT captured in Dynamics GP.
MO Detail Inquiry
Navigation: Utilities-Manufacturing-Update Routing Sequence Utility-Select a Record in the scrolling window-Item Number Hyperlink
This window is used to view the MO Detail that used to calculate the Average Labor Time in the Update Routing Sequence Utility scrolling window.
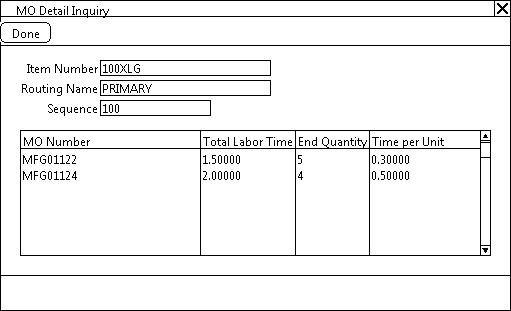
| Field | Function |
| Done Button | The user will click the DONE button to exit the window. |
| Item Number | The selected Item Number will display. This field is not editable. |
| Routing Name | The Routing Name display. This field is not editable. |
| Sequence | The Sequence will display. This field is not editable. |
| MO Number | The MO Number will display. This field is not editable. |
| Total Labor Time | The Total Labor Time will display. This field is not editable. |
| End Quantity | The MO End Quantity will display. This field is not editable. |
| Time per Unit | The Time per Unit will display. This field is not editable. Time per Unit is calculated as:
(Total Labor Time)/End Quantity = Time per Unit. |
Assumptions/Requirements:
Unless otherwise noted in this document, reporting is not included in this estimate.
Outside Processing Work Centers are NOT used within the Manufacturing Module.
If you are interested in this or any WilloWare design spec, please contact us at this link:
SpellCheck Release 2020-03-18
V12.1.26 / 14.1.17 / 16.1.14 / 18.1.6 / “GP Next”
* Addresses issue introduced in the 2-NOV-2017 build that could cause SpellCheck to not display the spelling suggestions
Item Process Tracking Release 2020-03-16
V12.1.15 / 14.1.10 / 16.1.6 / 18.1.3 / “GP Next” Changes 16-MAR-2020
* Updated WW Internal Resources
Read about Item Process Tracking
What is an update to “WW Internal Resources”? All of our software has a large amount of reusable code modules. For example, the About Window, the Installer, Error Reporting, and much more. Sometimes we encounter an unusual situation that causes a problem in something, so we’ll fix that and roll it out to all of our products. Another example is a change we recently made to a module that handles SQL Server queries where we made a small change to improve performance. A new release that contains only updates to “Internal Resources” is not critical, but should install it the next time you are doing updates to Dynamics GP.
LeanMFG Release 2020-03-11
V12.3.44 / 14.3.33 / 16.3.23 / 18.3.15 / “GP Next”
* Addressed issue in the posting routine that left records stranded in the IV Transaction Bins Work table.
* Addressed issue in MO Inquiry window that could cause the Costing Tab to display Non-Inventory Costs as $0 for MOs posted using a LeanMFG release on or before the 26-JUN-2019 release (#20201686)
* Full Install Required: a new routine in the installation process will check for and remove any records stranded in the IV Transaction Bins Work table
Price List by Store
VT1257
ACME sells landscaping products, such as stones and pavers. They have numerous stores in their State. Due to the difference in the cost of transport to get materials from the manufacturer or quarry to the different stores, each store needs to sell at a different price. Additionally, each store may sell a given product in a different Unit of Measure (such as Yards or Tons).
ACME wanted the following functionality in Sales Transaction Entry:
- A different U of M defaults for each item on a Per Site basis.
- A different Price List per Item on a Per Site basis
Description of Solution:
The solution below was created using WilloWare’s Virtual Triggers module.
ACME set up Item Price Lists where the Price Level is the same as the Dynamics GP Location Code (Site) used for each Store. This allows setting a “% of List Price” per Item-UofM-Store. The example below does not show Quantity-Price breaks, but they would be supported.
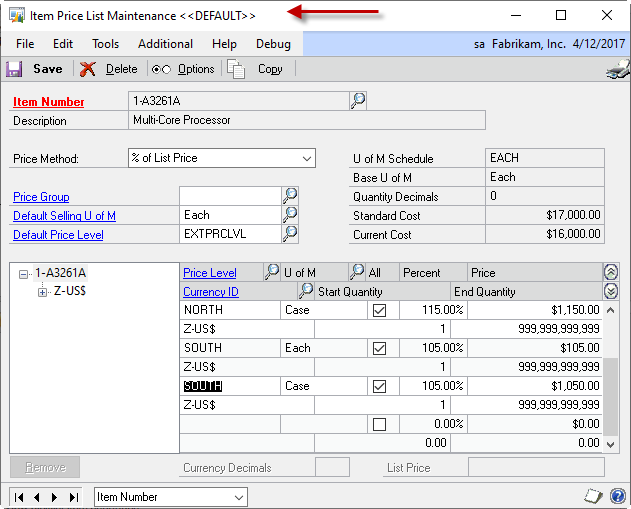
When there is only one Site-UofM record, that Price Level and Unit of Measure will default automatically onto the Sales Transaction Line for that Site. For example, when 1-A3261A is sold in Site NORTH it will default to CASE and use the NORTH Price Level.
If there is more than one Site-UofM record in the price list (such as for SOUTH with EACH and CASE), one of the Site-UofM records can be marked by selecting Additional >> Default on/off. This new Additional Menu toggles the “Default” setting of a line, and lines marked as default will be shown in the Title Bar of the window with “<<DEFAULT>>”. As shown above with SOUTH, if CASE is set as default, and then EACH is set as default, that will cause CASE to automatically be removed as the default UofM.
The Price List by Site functionality is only active when the Default Site ID is populated on the Sales Transaction. If that field is empty, Sales Transaction Entry will behave as it normally does.
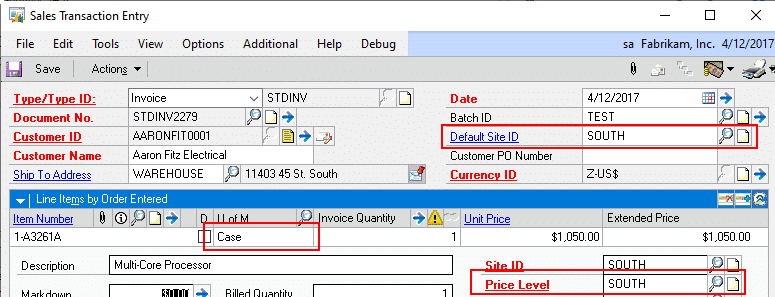
When the Default Site ID is populated, after entering an Item Number into the scrolling window (or in Sales Item Detail Entry), the enhancement will force use of the Site-specific Price Level and default Unit of Measure.
SOP-POP MultiLink
SOP-POP MultiLink provides superior flexibility in the ability to create and maintain links between back-ordered Sales Line and Purchase Order.
- Create links from a single Sales Order line to multiple PO Lines
- Create links from a single PO Line to multiple Sales Order lines
- Easily add and remove links
- Set priority of Sales Order fulfillment when PO Lines are partially received so that high priority orders are fulfilled first
- Create and maintain links without having access to Sales Transaction Entry or Purchase Order Entry
SOP-POP MultiLink Release 2020-03-08
V12.0.1 / 14.0.1 / 16.0.1 / 18.0.1 Changes
* First Release
This is a NEW PRODUCT! Please read more about SOP-POP MultiLink.
MFG PowerPack Release 2020-03-06
V12.3.156 / 14.3.103 / 16.3.69 / 18.3.30 / “GP Next”
* Vendor Pricing: addressed issue with 18.2 release and use of Vendor Item Number that cause Vendor Pricing to not display pricing (#20201698)
MFG PowerPack Release 2020-03-04
V12.3.155 / 14.3.102 / 16.3.68 / 18.3.29 / “GP Next”
* NEW MFG Tweak: Use MO Number for IV Doc Number. This Tweak causes Manufacturing to create Inventory Transactions using the MO Number for the IV Document Number. For example, the first Receipt of MO1234 will create Inventory Adjustment MO1234*1.
* Addressed error “Cannot find the object MFG_FUNC_Offset_From”. This was caused by the GP grant.all procedure not granting security on SQL functions. The installation routine now ensures that DYNGRP has been granteded access to this core Manufacturing SQL function (#20201461)
* This release requires a full install process to create a new SQL stored procedure (wspGetMONumber). Previously when MFG PowerPack needed to generate an MO Number it would call an existing Manufacturing module dexterity procedure. We discovered that sometimes, in high volume environments, this could result in the same MO Number being used by two different GP clients. The dexterity client has some delay between when it generates the “next MO number” and when that is saved back to the database, and this time time gap allowed another GP client to retrieve the same “next MO”. MFGPP now uses a stored procedure to retrieve/update the next MO number so that multiple GP clients can be assured to get a unique number.
LeanMFG Release 2020-02-11
V12.2.43 / 14.2.32 / 16.2.22 / 18.2.14 / “GP Next”
* Added a new routine that runs after posting completes to validate that the MO History table was correctly updated with the document numbers from the posted transactions
* Variance transaction now posts using GL Post Date from the MO Entry window rather than User Date
SpellCheck Release 2020-02-06
V12.1.25 / 14.1.16 / 16.1.13 / 18.1.5 / “GP Next” Changes
* Compatibility Release for “GP Next”
* Update WW Internal Resources
MFG PowerPack Release 2020-02-04
V12.2.154 / 14.2.101 / 16.2.67 / 18.2.28 / “GP Next”
* Capable To Promise (CTP): addressed issue that caused the BOM Quantity to be incorrect. This issue occurred when more than one Site was entered into the Sites list and there was inventory for a component in more than one of the selected sites.
* Sales Forecast Integration: new forecast export process achieve a performance improvement of 72% (#20201297)
* PowerATP: performance improvement when retrieving data for Service Calls and In Transit Transfer
2019 Review
We were busy in 2019 writing software for you! A major task was preparing new releases of all of our products for “GP Next”. We also added 28 NEW features across 9 of our products!
Below is a recap of the NEW functionality added to our products in 2019.
Blanket PO
Planned Release Wizard: This utility will calculate and create a number of releases, such as creating a release on the first Monday of every month. It can create planned releases using a fixed quantity until the Control Quantity is met, or, it can divide the Control Quantity evenly over releases in a specified time frame.
Auto-Firm Releases Utility: This utility will automatically create Firmed Releases when the Required Date meets selection criteria. Releases can be created before the Required Date by using the Vendor Lead Time and/or Purchasing Lead Time.
Complete Count
ExcelLink: Extended the setup option “Require Starting Count Before Printing Tags” to Exporting the count to Excel. If the option is NOT marked you will be able to select an unstarted count in the Excel Link window and export it to Excel.
Lot Reconciliation: When submitting Tags a new routine “allocates” the total counted quantity of a Lot Number across the available receipts of a Lot Number (assuming there are multiple receipts of the same Lot Number). Previously the module attempted to “consolidate” split receipts by putting all of the counted quantity onto one lot receipt record and zeroing the others. The new routine eliminates the potential to create a cost variance even through the total count matches the captured quantity. It handles the valuation methods as follows:
** LIFO: it counts forward from oldest receipt to newest so any shortages come out of the most recent recent (the LIFO receipt)
** FIFO: it counts backwards from newest receipt to oldest so any shortages come out of the oldest receipt (the FIFO receipt)
** AVG is treated like FIFO
Start No Item Count: A new Additional Menu option has been added to the Stock Count Schedule window that allows starting a Count that contains no Items. This may be used when recording counts in Excel. The Excel Import will add “new” items to the count during the import process.
Engineer To Order
Added a new GoTo menu item “Create MO”. The Mfg Estimate window can now create a Manufacturing Order for the Item on an Accepted status estimate. If the Estimate is linked to a Sales Line, it will link the MO to the Sales Line.
Added new reports for Estimated Quantities, Estimation Router, and Other Costs.
Added new Setup options for Routing Sequence Increment and Sequence Number Pad. The Routing Sequence Increment will default to the Manufacturing Setup value for “Sequence Spacing”, and if that is not set up (or is zero), it will default to 10 but the default can be changed. The Pad adds leading zeros to the Routing Sequence Number, so a Pad of 4 would result in “0010”, “0020”, “0030”, etc.
EZImport
Added a new Query window: a GoTo button on the EZ Import Inquiry windows provides direct access to query the EZ Import tables using the new Query window. For example, from the EZ Import Sales Inquiry window, select GoTo >> View Sales Lines, and the query window will show all of the data in the Sales Lines table for the selected Sales Order. The Query window provides a quick way to see all of the “extra” data associated with a record that is not visible on the Inquiry windows.
GP PowerPack
POP-Tweak: Purchasing Distributions Override: This Tweak previous contained two separate functions– “PURCH Distributions Override” and “PURCH Distributions By Line”. Th second is now split out into a separate Tweak (POP-Tweak: Purchasing Distributions By Line). When Purchasing Distributions By Line creates the new distributions, it previously populated the GL Reference with the PO Line’s Item Number. A new setup option allows choosing to fill the Reference field with (1) Item Number, (2) Item Description, (3) Vendor Item Number, and (4) Vendor Item Description. If you currently have Purchasing Distributions Override, the new Tweak “Purchasing Distributions By Line” will be enabled automatically.
Shortage Inquiry: NEW-when zooming to a Sales Transaction the window will automatically scroll so that the selected short item is displayed at the top of the scrolling window.
SalesPro Item Lookup: (1) Added Ship To Address to the window so that Customer Item Sales can be restricted by Ship To Address, (2) The GoTo button options are now dynamically added based on products installed and user security so it only displays options available to the user, (3) Added a Customer-Items view.
idModifier: We did a complete redesign! idModifier can now be “trained” to update/modify virtually any string (ID) field in core GP tables, 3rd Party Product tables, and custom tables. When creating a new Update ID, idModifier will search the database for a sample value (i.e. AARONFIT0001). It identifies all of the tables/fields that contain the sample. The search feature allows it to locate data in 3rd party tables, and to identify all of the different field names used to store the data (i.e. CUSTNMBR, CPRCSTNM, Bill_To_Customer, etc).
SOP Tweak: Require Customer-Item: this tweak prevents sale of an item if an Customer-Item record does not exist. This Tweak can be used to enforce a rule that requires customers to be approved to purchase items, or when they should only purchase certain items, such as private label inventory.
LoginMonitor: Added new functionality called Reserved Seats, which allows reserving a certain number of logins per User Class. For example, the User Class ADMIN could have 2 seats reserved. If the total user license count is 30, reserving 2 will make GP behave as if there are only 28 seats available for non-ADMIN users.
SOP Rules: (1) Added a new Rule called “Location Default by Document ID”. This Rule automatically sets the Sales Transaction Entry Location Code based on the Document ID. (2) The option to lock the Location Code field that is available with the three different SOP Rules that default the Location Code was previously only applied to the Sales Transaction Entry scrolling window. It now also locks the Location Code on the Item Detail Entry window. (3) Previously the SOP Rules functionality was always enabled if a Rule had been defined, regardless of whether or not SOP Rules was marked as “enabled” in the main GP PowerPack Setup window. All SOP Rules functionality now enables/disables based on the Setup checkbox.
LabelLink
Added support for label printing Automation modules. Several labelling software packages now have a server-based service for printing labels. This allows LabelLink to quickly send a label printing task to a dedicated PC, freeing-up the user’s computer to resume work while labels print.
On the LabelLink window, we added a “show” drop-down to control whether the window shows All Items, or only Items assigned to the selected label (Items can now be assigned to a label in Item-Label Setup).
Item Label Setup includes a SmartList import wizard to automate mass assignment of Items to a Label.
LeanMFG
MO Doc Type Setup: Added two new options, “Disassembly Wizard: Remove Non-IV Items” and “Disassembly Wizard: Reverse Non-IV Costs”. The first option will cause the Wizard to create a Disassembly MO that does not include any non-inventory type items. The second option will cause the Wizard to add non-inventory type items to the Outputs tab and then during posting to create a non-inventory Journal Entry that reverses the debits/credits from the original MO.
MFG PowerPack
Capable to Promise (CTP): Added integration to SOP Entry and SOP Inquiry. CTP can pull in a selected item, or all items, from a Sales Transaction.
BOM History Inquiry: This new tool is a “most recently used” list for GP Manufacturing BOM Entry and BOM Inquiry. Also, it adds a hot key (CTRL + Z) to zoom to a selected subassembly. Use CTRL+Z instead of the “Select Item” button on the BOM windows. “Select Item” only works when zooming to a subassembly that has the same BOM Type & BOM Name as the Parent Item (i.e. if the Parent is a MFG BOM and the child is an ENG BOM, it will not zoom to the ENG BOM). The CTRL+Z zoom will load any selected subassembly and as BOMs are viewed they are recorded in the new BOM History window. To return to any previously viewed BOM, simply double-click on it in the BOM History window.
MO Split: added a new setup option to choose what the Suffix Separator is. Previously the module was hard-coded to use a DASH (i.e. MO00123-001). If MOSplit is already in use, installing this build will detect that and automatically update MO Split Setup to use a DASH as the seprator. Setup will allow using any single character as the separator. This change also addresses a conflict between MOSplit and WilloWare’s MO Generator “Create Child MOs” utility, which also uses a DASH.
Item Copy: (1) the window now remembers the “Zero Standard Cost” setting rather than defaulting to enabled. “Zero Standard Cost” setting has been moved off the header section of the window and is in now under “Item Maintenance” (2) Performance improvements, (3) Under “Item Price List Maintenance” added a new option to zero the price list after copying it. (4) Routing Map now creates a default mapping for the primary routing using the Destination Item Number as the Routine Name if no mapping is provided, (5) The Routing Map now clears after copying an item, (6) Routing Map now has options for how it creates the Routing Name. Under the “Routing” option, click the image next to the “Default Routing Name” setting to change the default between Destination Item Number and Source Routing Name (7) Under “Item Currency Maintenance” added a new option to zero List Price (8) The installer will now add a stored procedure to the database (wspItemCopyPost) that will run after all other copying tasks. The stored procedure can be edited to include any custom ‘post copying’ updates that are needed.
PowerATP: Holds column now shows the Hold indicator for Purchase Orders, Manufacturing Orders, Picklists, and Service Calls, in addition to Sales Transactions.
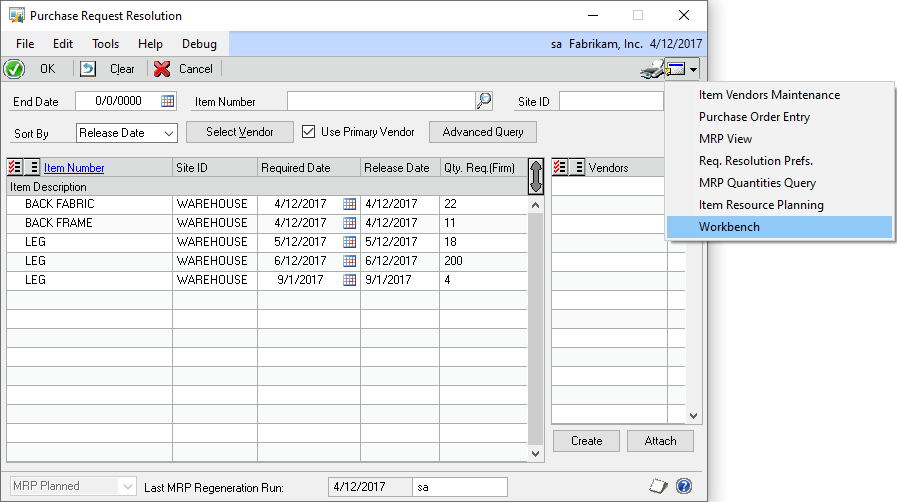
NEW MFG Tweak: Purchase Request Resolution Goto MRP Workbench. Adds a menu item to the Goto button on the Purchase Request Resolution window that provides access to the MRP Workbench window. MRP Workbench will open with the Item-Site Restriction set based on the row selected in the PRR window.
NEW MFG Tweak: Create default SOP-MOP Links. When using SOP Copy to create a new Sales Document, or add lines to a Document, default (IS010001) records will be created during the copy routine.
MO Generator Suite
MO Receipt Integration: added an option to check for component shortages before attempting to post the receipt. This will be enabled automatically if the Inventory Module option to override shortages is NOT marked. If Inventory allows overrides, checking for shortages in MORI will be optional.
MFG PowerPack Release 2020-01-20
V12.2.153 / 14.2.100 / 16.2.66 / 18.2.27 / “GP Next”
* Item Copy: fixed issue with Excel import that caused it to only read the first line
* NEW MFG Tweak: SOP Copy Create MOP-SOP Links. When enabled it will create default SOP-MOP Links (IS010001) records during SOP Copy.
LeanMFG Release 2020-01-14
V12.2.42 / 14.2.31 / 16.2.21 / 18.2.13 / “GP Next”
* Fixed issue with installer that generated an “invalid length parameter” error (#20200711)
CompleteCount Release 2019-12-05
V12.1.43 / 14.1.33 / 16.1.26 / 18.1.16 / (GP Next)
* Excel Import: changed to allow import of a count with Item Type = Discontinued inventory (#20200057)
MFG Import Release 2019-12-11
V12.1.46 / 14.1.29 / 16.1.17 / 18.1.10 / “GP Next”
* “GP Next” compatibility updates
MOGenerator Release 2019-12-06
V12.1.92 / 14.1.67 / 16.1.45 / 18.1.12 / “GP Next” 6-DEC-2019
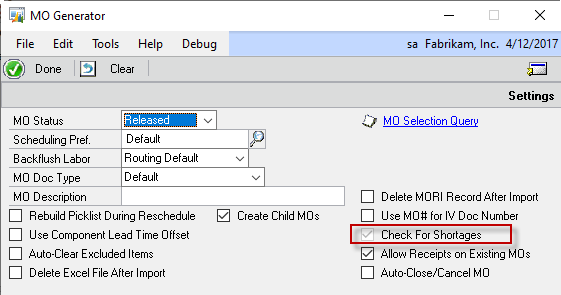
* MO Receipt Integration: added option to check for component shortages before attempting to post the receipt. This will be enabled automatically if the Inventory Module option to override shortages is NOT marked. If Inventory allows overrides, checking for shortages in MORI will be optional.
The Settings section of the MO Generator window has been rearranged in this build to group the MORI settings together on the right side of the window. Check For Shortages is shown below in RED. It is disabled because the Inventory Module “Allow Adjustment Overrides” options is UNMARKED, which means you cannot drive inventory negative. In this setup, MORI will now check for shortages before attempting to post an MO Receipt report an error if there are. It will then move to the next MO. If the Inventory Module allows overrides, “Check For Shortages” will be enabled and UNMARKED by default (this mirrors the previous functionality of requiring that inventory allows overrides).
CompleteCount Release 2019-12-05
V12.1.42 / 14.1.32 / 16.1.25 / 18.1.15 / (GP Next)
* Fixed case sensitivity issue that caused errors on a binary sort database
LeanMFG Release 2019-12-05
V12.2.41 / 14.2.30 / 16.2.20 / 18.2.12 / “GP Next”
* Fixed two case issues that caused errors in a binary sort order database (#20198902)
MFG PowerPack Release 2019-11-19
V12.2.152 / 14.2.99 / 16.2.65 / 18.2.26 / “GP Next”
* SmartParts: Addressed issue with the interaction between SmartParts and Item Copy was causing SmartParts to not increment the auto-incrementing segments (#20198595)
* PowerATP: Holds column now shows the yHold indicator for Purchase Orders, Manufacturing Orders, Picklists, and Service Calls, in addition to Sales Transactions.
* NEW MFG Tweak: Purchase Request Resolution Goto MRP Workbench. Adds a menu item to the Goto button on the Purchase Request Resolution window that provides access to the MRP Workbench window. MRP Workbench will open with the Item-Site Restriction set based on the row selected in the PRR window.
The new Tweak adds a “Workbench” item to the GoTo button on Purchase Request Resolution.
LeanMFG Release 2019-11-19
V12.2.40 / 14.2.29 / 16.2.19 / 18.2.11 / “GP Next”
* MO Entry: removed dependency of the posting process on the having the MO Entry window open so that it can be used to with integrations to automatically post MO Receipts.
* Full Install Required: this build adds a new table (WMFG7000/wPostingErrors) to record errors encounted when the posting process is called remotely
GP PowerPack Release 2019-11-11
V12.3.142 / 14.3.85 / 16.3.53 / 18.3.25 / (GP Next)
* idModifier: addressed issue that prevented marking lines as “deleted” to prevent them from being included in the update.
* SOP Rules: (1) NEW: added “Location Default by Document ID”. This Rule automatically sets the Sales Transaction Entry Location Code based on the Document ID. (2) Added navigation to access the SOP Rules Setup window from the main GP PowerPack Setup by double-clicking on “SOP Rules*”. (3) The option to lock the Location Code field that is available with the three different SOP Rules that default the Location Code was previously only applied to the Sales Transaction Entry scrolling window. It now also locks the Location Code on the Item Detial Entry window. (4) Previously the SOP Rules functionality was always enabled if a Rule had been defined, regardless of whether or not SOP Rules was marked as “enabled” in the main GP PowerPack Setup window. All SOP Rules functionality now enables/disables based on the Setup checkbox.
GP PowerPack Release 2019-11-01
V12.3.141 / 14.3.84 / 16.3.52 / 18.3.24 / (GP Next)
* idModifier: added support for maximum SQL table and field name length of 128 characters.
* LoginMonitor: (1) Added new functionality called Reserved Seats, which allows reserving a certain number of logins per User Class. For example, the User Class ADMIN could have 2 seats reserved. If the total user license count is 30, reserving 2 will make GP behave as if there are only 28 seats available for non-ADMIN users.
* Full Installation is required. (1) Creates the new Reserved Seats table (W5026LogMonSeats). (2) IDTables (W5026IDTables) is dropped and re-created with different columns. Data is not migrated, so idModifier IDs need to be recreated.
CompleteCount Release 2019-10-30
V12.1.41 / 14.1.31 / 16.1.24 / 18.1.14 / (GP Next)
* Tag Reporting: Re-enabled the ability to run the Variance report to screen w/Excel export and added an option to choose which method is used to run the report (Excel export or as a Report Writer report). Builds V12.0.28 / 14.0.18 / 16.0.11 / 18.0.1 removed the “to screen” with Excel export method and replaced it with a GP Report Writer report due to poor performance of the Excel export method with large datasets. The performance issue is inherent in exporting to Excel and still remains with the re-enabling of this functionality.
GP PowerPack Release 2019-10-21
V12.2.140 / 14.2.83 / 16.2.51 / 18.2.23 / (GP Next)
* idModifier: added nullable string fields to the field search to account for non-Dynamics GP tables
SpellCheck Release 2019-10-03
V12.1.24 / 14.1.15 / 16.1.12 / 18.1.4 / “GP Next”
* Compatibility Release for “GP Next”
MFG Import Release 2019-09-30
V12.1.45 / 14.1.28 / 16.1.16 / 18.1.9 / “GP Next” Changes 30-SEP-2019
* Compatibility Release for “GP Next”
MOGenerator Release 2019-09-30
V12.1.91 / 14.1.66 / 16.1.44 / 18.1.11 / “GP Next”
* Compatibility Release for GP Next
* MOGen-Create Child MOs: Addressed issue that could cause the routine to leave a MOP Security Lock on the Parent (top-level) MO.
* Downgrade build for GP2010 (11.1.95) based on this build
GP PowerPack Release 2019-09-25
V12.2.139 / 14.2.82 / 16.2.50 / 18.2.22 / (GP Next)
* Extended Lot Attributes: addressed issue that allowed saving and closing the lot attribute window when required date fields were not entered.
MFG Data Archive Release 2019-09-23
V12.1.25 / 14.1.16 / 16.1.11 / 18.1.2 / “GP Next” Released 23-SEP-2019
* Compatibility Release for “GP Next”
LabelLink Release 2019-11-27
V12.2.40 / 14.2.23 / 16.2.12 / 18.2.5 / “GP Next” Changes
* Compatibility Release for “GP Next”
LeanMFG Release 2019-09-19
V12.1.39 / 14.1.28 / 16.1.18 / 18.1.10 / “GP Next”
* Compatibility Release for “GP Next”
* Addressed issue in installation routine that caused SQL error (“Invalid length parameter passed to the LEFT or SUBSTRING function”)(#20193743)
* Addressed issue that allows user to close the window during posting which results in an illegal address error (“Illegal address for field ‘cbIsPosting’ in script ‘PostingFlag’. Script terminated”)(#20193691)
* Addressed issue that caused error when user clicked the Input Qty Expansion button when no line was selected in the Inputs Scroll (“Error: set precision passed bad precision value”). (#20192405)
Item Process Tracking Release 2019-09-19
V12.1.14 / 14.1.9 / 16.1.5 / 18.1.2 / “GP Next”
* Compatibility release for “GP Next”
MFG PowerPack Release 2019-09-18
V12.2.151 / 14.2.98 / 16.2.64 / 18.2.25 / “GP Next”
* Compatibility Release for “GP Next”
* Where Used Inquiry: (1) addressed issue that caused the window to display duplicates when “View All” was selected (#20192831), (2) added new checkbox (“Expand to where used”) that controls if the treeview displays nodes expanded to the “where used” item, or if all nodes are collapsed, (3) after entering the Item Number, the first valid BOM is displayed, rather than defaulting to MFG BOM. For example, if an MFG BOM does not exist, it would default to the first available BOM sorted by BOM Type (BOMCAT_I) and BOM Name from the BOM Header table (BM010415).
* MO Doc Types: addressed issue that caused the “default” MO Number generated by GP Manufacturing to be retained in the WO Master table (WO010032) after selecting the new Doc Type generated MO Number (#20192671)
EZImport Release 2019-09-16
V12.1.14 / 14.1.7 / 16.1.5 / 18.1.3 / “GP Next”
* Compatibility release for “GP Next”
GP PowerPack Release 2019-09-12
V12.2.138 / 14.2.81 / 16.2.49 / 18.2.21 / (GP Next)
* NEW SOP Tweak: Require Customer-Item: this tweak prevents sale of an item if an Customer-Item record does not exist. This Tweak can be used to enforce a rule that requires customers to be approved to purchase items, or when they should only purchase certain items, such as private label inventory.
* Sales Pro: Added Customer Items view