Customization DS1512
MO Manager
Problem Definition:
ACME produces large Design to Order/Configure to Order/Engineer to Order equipment for the horticulture industry. They use Dynamics GP Manufacturing with WilloWare’s MO Generator. A “Master Assembly” (top level item) may be made from a large number of subassemblies, sometimes up to 140. MO Generator creates “Child MOs” for each of these subassemblies. ACME needs an efficient way to manage all of the subassembly manufacturing orders. They would like to be able to:
- See all related MOs in one place
- Have an easy way to see the “status” of MOs (not the MO Status, but where things are in the process from procurement to picking to production)
- Provide a way for Kitters to record picking transactions that can easily be reviewed by office staff before being entered into Component Transaction Entry
- Easily see component shortages for subassemblies
- Provide a way for Builders to record changes they make and indicate when the MO is done
- See when subassembly MOs are complete
A similar process occurs with Conveyors. A sales order is created with one sales line for each component of the conveyor. Manufacturing Orders are created and linked to each sales line. ACME would like to be able to manage these related MOs in the same manner as described above.
The Master Assembly-Subassembly (Parent-Child) structure is only one level deep. With Conveyors, the “top” level is the Sales Order itself, with one level of MOs below that.
ACME does NOT use multi-bins. The “bin number” field is used on the Item Quantities Maintenance window. Most items, but not all, are assigned a BIN. Items that do not have a BIN assigned do not need to be picked so do not need to be shown in the user interface.
Solution Overview
WilloWare will create a new window in GP called “MO Manager” that will pull together all of the information for a related set of manufacturing. Color coded icons will help users visually identify component shortages, and MOs ready to be picked, among other things. MO Manager will be able to create a Pick Transaction that is informational only until reviewed by office staff, and Build Transaction that tells office staff the MO is Done and ready to be received.
Design Features
Bin Routing
Navigation: Tools >> Setup >> Manufacturing >> Bin Routing
The Bin Routing window is used to specify the most efficient way for a Kitter to traverse the warehouse when picking inventory. The Picking window in MO Manager will display the picklist bins in the order specified in the Bin Routing window so that Kitters know where to go first to get inventory, then where the next stop is, and so on until the entire picklist has been picked.
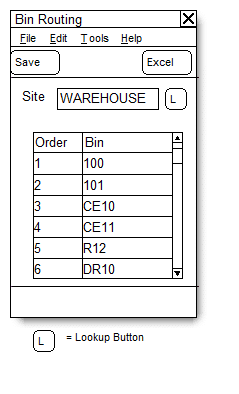
| Field | Function |
| Site | Select a Location Code (Site) |
| Order | System generated, increments by 1 as each Bin is entered |
| Bin | Enter a Bin |
The most efficient way to load the Bin Routing window is through Excel. Create a spreadsheet with the bins listed in the desired order. Save the spreadsheet. Click the Excel button and locate the file. The existing list of BINS will be cleared (deleted) and replaced by the Excel import.
The Excel file should NOT have a column header. But the first BIN in cell A1, then A2, etc.
MO Manager
Navigation: Transactions >> Manufacturing >> MO Manager
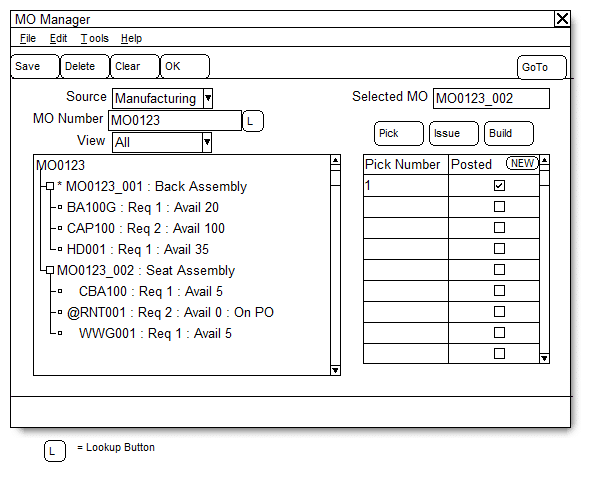
| Field | Function |
| Source | Options:
|
| MO Number/Sales Order | Depending on the Source selected, the label for this field will show either MO Number or Sales Order. When an MO is selected, the treeview will fill with MOs that are linked by the MO Number. (parent and child). When Sales Order is selected, the treeview will fill with MOs linked to the Sales Order through the MOP-SOP Links table. |
| View | Options:
|
| Go To | Options include:
|
Click on an MO (or any of the components below the MO) to “select” the MO in the right side of the window. Once selected, click Pick, Issue or Build to view those documents for the selected MO.
Component Icons
The following icons appear next to each component to indicate the picking status of the component.
- = Not picked, no inventory available
- = Not picked, partial inventory available
- = Not picked, full inventory available
- = Partial pick, no inventory available for remaining requirement
- = Partial pick, partial inventory available for remaining requirement
- = Partial pick, full inventory available for remaining requirement
- = Completely picked
MO Status Icons
The following icons appear next to each MO to indicate the status.
- = Open MO, no inventory picked
- = Pending Pick Transaction
- = Open MO partially picked
- = Open MO completely picked. MO is ready to be RELEASED
- = Released MO
- = MO partially received
- = MO Complete
PICK BUTTON: This is used by Kitters to create a Pick Transaction. Select an MO then click the PICK button to view Picks linked to the MO or to create a new Pick. See the PICK section of the documentation for more details.
ISSUE BUTTON: When a Pick has been recorded, office staff need to Release the MO and create an ISSUE transaction. Click the ISSUE button, then click NEW. If the MO is not already RELEASED, the MO Entry window will open automatically and display the selected MO. Change the MO Status to Released, save the MO, close MO Entry and return to MFG Manager. Click the NEW button again to open the MCTE window. See the ISSUE section of the documentation for more details.
BUILD BUTTON: This is used by Builder to create a Build Transaction. Select an MO, then click the BUILD button to view Build Transactions linked to the MO or to create a new Build. See the BUILD section of the documentation for more details.
TREEVIEW: The treeview displays the Parent MO (Master Assembly) and all of the related subassembly MOs. In the case of Conveyors, it shows the Sales Order Number and all of the MOs linked to the Sales Order.
- For the MO lines it will show: MO Number, Item Number, Item Description
- For the Component lines it will show: Item Number, Description, QTY Required, QTY Remaining (i.e. QTY Required less QTY already picked), QTY Available
PICK

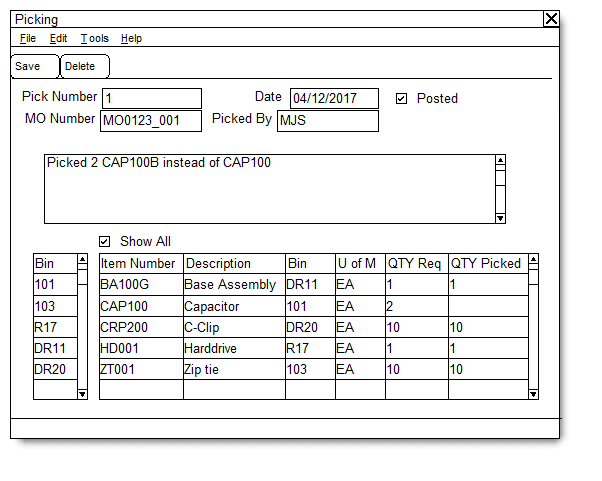
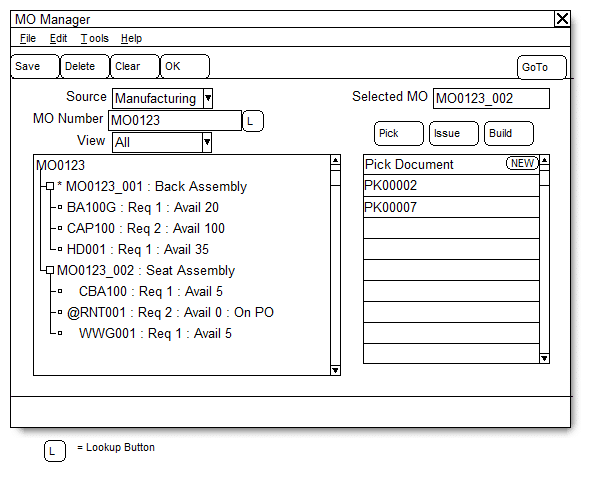
Select an MO, then click the PICK button to view Picks linked to the MO or to create a new Pick. To view an existing Pick, click on it in the scrolling window, then click the “Pick Number” zoom in the header of the scrolling window.
To create a new Pick, click the NEW button. The Picking window will open. The Picking window is used by Kitters to enter a pick.
| Field | Function |
| Pick Number | System generated. Increments by 1 for each Pick. |
| MO Number | Displays the MO Number selected in the MO Manager window. |
| Date | Defaults to the User Date. If the Pick occurred on a different date it will be changed to the correct date. |
| Picked By | Defaults to the GP User ID. Something different can be entered if needed. |
| Posted | When office staff enters the Pick as an ISSUE Transaction in Component Transaction Entry, mark the Posted box. This will remove the “Pending Pick” status from the MO. |
| Comments Box | Enter free text comments, notes, messages, etc. here. This can be used to provide details of component substitutions. |
| BIN Scrolling Window | This window shows the bins that must be visited to pick this MO. The bins are shown in the most efficient travel pattern, so start by going to the bin at the top of the last and work your way down the list.
DOUBLE CLICK on a bin to change the parts list so it shows ONLY the parts to be picked from the selected bin. When you select a bin, the Show All box unmarks automatically. Re-mark it to see all items in all Bins. |
| ITEMS Scrolling Window | This window shows the picklist for the MO sorted by Item Number. When a BIN is selected, the window will show only the Items in that BIN.
QTY Required is the Quantity Required Remaining (i.e. QTY Required – QTY Issued.) Enter the Quantity Picked. |
ISSUE
A Pick Transaction is informational ONLY. It does not affect inventory in GP. When a Pick Transaction is saved, the MO Manager window will show the status of the MO as “Pending Pick Transaction”. A Pending Pick Transaction must be recorded as an “Issue Transaction” in the MFG Component Transaction Entry window. Use the following steps:
- Select the MO in the treeview, then click the PICK button
- Select the Pending Pick (the Posted box is not marked), then click the “Pick Number” zoom to open it in the Picking window. You can now view the Pick as recorded by the Kitter so you have it open while creating the Issue Transaction.
- Then click the ISSUE button and click NEW.
- If the MO is not already RELEASED, the MO Entry window will open with the MO Number selected, and the Transaction Type set to ISSUE.
- Enter the Pick Transaction information into the MFG Component Transaction window, then POST the Issue Transaction.
BUILD

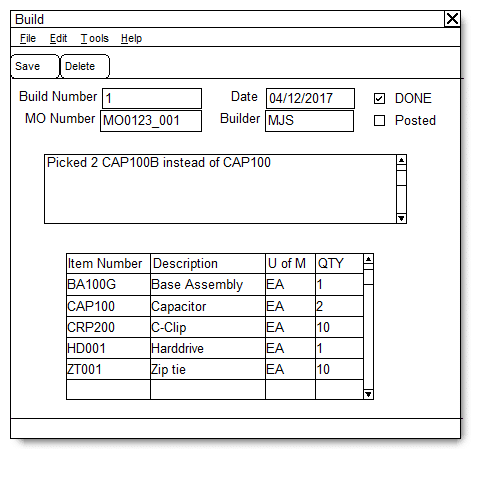
The Build window is used by Builders to record Production. When production is complete, follow the steps below to record a Build Transaction:
- Select the MO, then click BUILD and click NEW. The Build window (above) will open.
- Enter notes for the MO, such as component substitutions.
- Mark the DONE checkbox. The POSTED checkbox cannot be marked until DONE is marked. Posted is used by office staff after the MO Receipt as been recorded.
- Save the Build Transaction.
- MO Manager will now show the status of the MO as “Pending Build Transaction”.
RECEIVE

When the status of an MO is “Pending Build Transaction” the office staff need to record an MO Receipt:
- Select the MO in the treeview
- Click BUILD. Click on the Build Transaction then click the “Build Number” zoom in the header of the scrolling window to open the Build window and display the Build Transaction.
- Click Go To >> MO Receipt Entry
- Use the notes from the Build Transaction to create and POST an MO Receipt.
- On the Build window, mark the POSTED checkbox and click SAVE.
For information on this design, or any other WilloWare customization or product, please contact us:
WilloWare is now developing customizations and products for Business Central D365! Contact us to discuss your needs.